More recently, it was presented to your attention. The article was unexpectedly popular and I decided to shoot a sequel. Meet the scanner for digitizing film and photo slides. In other words, BACK IN USSR!
PURPOSE OF THE GADGETS
In the era of total pix Pussy lization only the Old Believers remained devoted to spiritual film photographs. It is they, the people who were made in the USSR, who are very familiar with this picture: Let me explain to those who grew up on Yabloki: this is how photographs used to be born in agony and scarlet twilight. All technological process I won’t describe it: the elders know it, but the youth have no use for it. The result of such creativity was often such photographs
  And it was cool! My first 5 rubles were earned by replicating such posters... The footage was carefully stored in the format of negative film or stacks of slides. Personal photographs were placed in memorial albums. And then there were endless moves, repairs, removal of rubbish to the dacha... and many photographs were already lost forever. But there are films!!! What's the point of them: which of us regularly prints photos on paper?! The most we can do is upload the footage to the cloud. How great it would be to have an album from the 80s and 90s on your phone... A solution has been discovered: the films need to be digitized. It’s much easier to print photos from slides and scan them. But there is a solution that is not simple, but very simple. Grandfather Liao’s device, which I bought at DH, will help us digitize the slides - easy captcha... The cost of the device at the time of purchase was $51, taking into account points and prize money it cost me a little more than $20. I took it for a test drive and this is what I tried...
Product information from the site
SPECIFICATIONS:
- Function: film digitization
- Interface: USB 2.0
- Image sensor: 5.0 mega pixels (2592 x 1944)
- Display: Color 2.4 TFT LCD (480 x 234)
- Focus Range: Fixed Focus
- Exposure Control: Automatic / Manual (-2.0EV ~ +2.0EV)
- White balance: automatic
- Resolution: 5.0 mega pixels / 10 mega pixels (interpolation)
- Scan quality: 1800dpi and 3600dpi (interpolation)
- Film type: 35 mm film, monochrome, slide
- Image effects: b/w, slides, negatives
- Light source: LED backlight
- File format: Image: JPEG
- TV-OUT type: NTSC / PAL
- external memory card: Supports SD cards up to 32 GB
- Power: DC 5V (USB port adapter)
- Multi-language support: English, French, German, Italian, Spanish, Chinese, Japanese
- System support: Windows XP/Vista/7
EQUIPMENT:
- 1 x film scanner
- 1 x USB cable (80 cm)
- 1 x AV cable (155cm)
- 3 x slide and film holders
- 1 x 110~240V AC adapter
- 1 x User Manual (English)
- 1 x 2 GB SD card
- 1 x Brush
PACKAGE
Due to the fact that the device is simple and, moreover, not crystal, the seller did not particularly bother with packaging. The box was carefully wrapped with tape and polyethylene. Despite this, everything arrived safe and sound. The box itself is much larger than the device due to the included film guides. In addition to the gadget itself, the package includes: 3 guide clamps for film and slides, a power supply, a 2 GB SD card + reader, a cable for connecting to a tulip-type video connector, a brush for cleaning the scanner screen and a manual in English.
 Everything is as promised on the seller's website.
 SCANNER
The device is a lightweight plastic box with a 2.4-inch monitor on the top edge and small dimensions. In the lower part there is a hole made to fit the size of the tray feeding the film. The holes are closed with a spring curtain to prevent debris from entering the scanner area. There is nothing on the front side. On the reverse side there is a mini USB connector for power and connection to a computer, as well as a connector for transmitting a video signal.
  A little higher is the SD card slot.
  The scanner screen is 2.4" in size with a simple TFT matrix, the capabilities of which are barely enough to make out faces in photographs. However, you can distinguish a cat from a giraffe. The display itself transmits color images, which is necessary when processing color photographs.
  Above the screen are three blue ice indicators SD, Power and PC. The first indicates that a memory card is installed in the slot and blinks during operations involving it. The second one lights up in any mode if the scanner is turned on. The third lights up when the device is connected and recognized by the PC. To the right of the display are two scroll buttons “up” and “down”. On the left is the “Play” button, also known as OK, just below is the image rotation button. There are two buttons at the bottom: “Menu” which is responsible for the menu, turning the device on and off, and “Scan” which performs scanning.
 That's all the poor functionality.
PREPARATION FOR WORK
Before the scanning session, it is necessary to prepare all the necessary props and bring the slides into full combat readiness. First of all, we sterilize the working surface of the scanner. To do this, just walk inside the scanner with the supplied felt swab and remove all debris.
 Now we take the required frame-holder for the sources.
  One of the adapters allows you to charge a piece of film of 5 frames, another - 4 slides and the third - up to 10 slides at the same time. I liked the third option. It is into this that we charge and charge precious personnel.
 Up to 10 “cartridges” are placed in the “magazine” for slides; the feed is carried out by jerking the shutter (this is exactly the association that came to mind).
 When everything is ready, it's time to insert the magazine into the corresponding hole on the side of the scanner.
 AND NOW THE BIRD WILL FLY OUT!
To do this, you need to turn on the scanner to the network. The blue Power diode will immediately light up. Since the device does not have internal memory, you need to insert a memory card into the appropriate slot. Another blue LED will light up - SD. A menu of the following items will appear in front of us:
First of all, select the language in the tab LANGUAGE.
 Next, select the type of photo in the tab CAPTURE, of which there are three: negative, black and white positive, color positive.
  You can turn negative into positive and vice versa with just one click. The method of processing the photo depends on the selected mode. You will immediately see the processing itself on the screen. What can you do in processing mode? For example, select the photo quality in RESOLUTION- 5 or 10MP. Naturally, the second point is due to interpolation.
  You can also rotate the photo by 90-180-240* using the button ROTATION

 It is also possible to change the contrast and brightness of the image in the tab EXPOSURE.
  ...from maximum...
  ...to the minimum...
  When all the fine adjustments have been made, press the button Scan and the picture will be transferred to the memory card.
 In dynamics the process looks something like this

The scanning process itself is filmed in detail on video from the seller’s page
CONNECTION TO TV and PC
The device is connected to the computer via a miniUSB-to-USB cable and is defined as a storage device. Everything is simple here. The device is connected to the TV using the supplied cable for transmitting a video signal, one end of which is inserted into the device (headphone jack), and the other into the yellow tulip on the TV. The TV serves as a monitor projector. Now we can see everything that the scanner records.
 Considering the quality of the standard cord, it’s still a pleasure!
 RESULT
As a result, these are the pictures you get:

 Characteristics of source codes
  It is difficult to judge the quality due to the lack of originals on photographic paper. I assume that the quality will be 1 to 1. Formally, the scanner performs the function of a light box with a built-in photo module. It’s not difficult to build one yourself, but as Brekotkin said, “Why do you need all this complexity?!”
 Instead of an afterword. When all the slides available at home were digitized, I took up my parents’ archive (which is much more personal). Having finished that too, the device was passed around among friends and acquaintances. After a month of wandering, in the absence of hackwork, the scanner was freed for $50 in compensation. The Chinese guy is working somewhere... I'm planning to buy +27 Add to favorites I liked the review +41 +68
We can high-quality digitize photographic film in rolls and lengths, scan negatives, positives and framed slides. Digitization of photographic films is carried out on professional Nikon Super CoolScan 5000 ED film scanners with a resolution of up to 4000 dpi, hardware removal of scratches and dust Digital ICE (only when scanning color film) at the price of a simple photo lab. The average order fulfillment time is from 2-3 days to a week. The output is JPEG, TIFF or NEF (Nikon RAW). Film in rolls is considered cheaper than film cut into pieces.
We also perform digitization with a resolution of up to 6400 dpi:
- medium format photographic films 6x4 - 6x9 cm, belonging to type 120;
- wide photographic films 9x12 cm.
How much does it cost to digitize photographic films?
- How to choose the right film scanning resolution;
- How to understand additional scanning options;
- How to color a b/w photograph, do retouching or restoration.
How is the price of digitizing photographic films, negatives and slides calculated?
Option 1. Price per roll. It is more profitable to scan entire rolls than frames one at a time with manual selection. If, for example, you brought more than 30 rolls, given that one roll contains from 36 to 40 frames, converting them to digital will cost very little - 5 rubles / frame. This option is used when scanning negatives - the positive film is usually already cut into separate slides, and digitizing the slides is always considered according to option 2.
Films with traces of improper storage: heavily curled, several pieces in one package, damaged or cut when it is impossible to scan the whole thing (the scanner does not accept it) are cut into smaller pieces and are also counted at the prices of option 2.
Option 2. Price per frame. Selective digitization of photographic films: this is either scanning negatives and positives in segments of 2-6 frames, or converting single framed slides into digital format in batch mode. Don't take them out of their frames—digitizing stripped slides costs twice as much because it requires more manual work.
- Films with damaged perforations, single slides without frames, stereo slides and APS films (IX240) are considered with a 100% surcharge;
- Empty spaces are tracked and not scanned;
- You can select frames by numbers;
- Digitization of negatives and positives costs the same.
| Option 2. Selective scanning of film in sections and slides in frames | Price per frame, rub. | ||
| Up to 200 pcs. | From 200 to 1000 pcs. | More than 1000 pcs. | |
| Rate "Budget": 1200 dpi, 1734×1183 px, 10x15 cm | 12 rub. | 10 rub. | 8 rub. |
| Rate "Amateur": 2400 dpi, 3469×2367 px, 21x30 cm | 16 rub. | 14 rub. | 12 rub. |
| Rate "Pro": 4000 dpi, 5782×3946 px, 32x48 cm | 20 rub. | 18 rub. | 16 rub. |
The price includes a single-pass scan with a depth of 24 bits. The rest are additional options for demanding customers, further improving the quality of the scan. For example, we recommend first of all increasing the number of passes (optimally 2-4) - they significantly increase the purity of the image, reducing the noise of the scanner matrix.
| Name of auxiliary service | Price |
| Recording to external HDD or client flash drive | for free |
| Recording to our 16 Gb flash drive | 1000 rub./pcs. |
| Recording to our 32 Gb flash drive | 1700 rub./pcs. |
| CD/DVD recording, boxing, cover, painting | 90 rub./pcs. |
| Burning to Blu-ray Disc | 300 rub./pcs. |
| Cassette tape repair (audio/video) | 300 rub./pcs. |
| Custom CD/DVD/Blu-ray cover design | 900 rub./pcs. |
| Printing a custom CD/DVD/Blu-ray cover | 200 rub./pcs. |
| Creating a DVD Menu | 150 RUR/pcs. |
High-quality digitization of photographic films
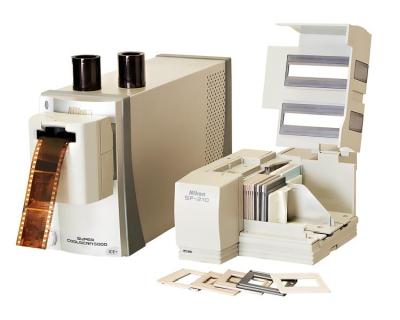 We use only professional slide scanners Nikon Super Coolscan 5000 ED, they undergo regular maintenance, so digitizing your photographic films with us is truly a good choice. The result will be better than on any tablet or photo lab and even better than on the cheaper Nikon Super CoolScan 4000 ED model, which is more common in the arsenal of studios and which the five-thousander outperforms in several respects:
- Dynamic range: 4.8D vs 4.2D. You will see more details;
- ADC bit size: 16 bits versus 14. Get more shades of color;
- The speed is almost twice as high. You won't have to wait long for your order to be completed;
- More image enhancing features: Digital DEE, Scan Image Enhancer.
Batch digitization of slides on Nikon CoolScan
Trust us to digitize your slides and films
By scanning both negatives and slides, we try to improve the image as much as possible. This includes infrared dust removal, color correction, and framing if desired by the client. If necessary, we can apply a color filter to give your shots a special tint. In the future, using Photoshop, we can retouch the frames and make deeper image corrections.
The result of digitizing photographic films depends on the condition of the film, on your wishes and the skill of our employees, who pay close attention to your priceless archives and put their souls into their work, sometimes empathizing with the touching stories of entire families, which are often closely connected with the history of our country. Still images of the war years or the wedding of a beloved grandmother, the 1980 Olympics, rare footage of famous cosmonauts or artists on holiday - we will carefully digitize any materials.
How to order digitization of photographic film
- You can come to our studio in person. This is the most reliable way. You will be able to see for yourself how everything happens and know for sure that valuable materials will not leave our premises. We work seven days a week.
- You can call a courier to any district of Moscow.
- You can use one of 2,000 collection points throughout Russia.
Ordinary scanners are not designed for scanning slides and negatives due to insufficient backlighting. However, there is a trick that will allow you to do this using a small amount of cardboard. By constructing a clever design, you can redirect the light flux and achieve the desired result.
If you have old negatives lying around in your archive that you would like to convert into digital format, you have the opportunity to scan them. But simple scanning will not work for these purposes. In order for everything to work out, you need a powerful light source, which should be located behind the negative or a multi-functional scanner.
Of course, you can buy a special scanner for films, but if you already have a regular flatbed scanning device, you can get by with it. You can use a regular cardboard reflector to scan film or slide. It will capture the light emitted by the scanner and reflect it off the back of the slide. Such a reflector will make it possible to scan films and slides like regular documents.
To make a reflector we will need the following materials:
Sheet of thick A4 cardboard with silver side
Pencil
Scissors
Scotch
Ruler
Instructions

Step 1: On the non-silver side of the cardstock, print or draw the following pattern.

Step 2: Cut out the template and fold it so that the silver side is facing inward.

Step 3: Connect the template into a triangle. It should resemble a wedge. This will leave one side open. The shiny part must be inside.

Step 4: Next you need to glue the corners of the reflector. After the glue has dried, the device is ready for use.

Let's start using our reflector. Place film or slide on the scanner glass. Place a reflector on top. To achieve a good result, align one side of the slide with the center of the reflector. There is no need to close the scanner cover. You can start scanning. If you end up with uneven lighting in your photo, you can try placing a thin sheet of tissue paper between the negative and the reflector. The paper will diffuse the light flux and prevent the scanner from capturing the space behind the film.
Having achieved a satisfactory result, you need to crop the image along the contour of the slide, since the scanner scans the entire glass, and we only need a small frame. Cropping can be done in any graphics editor. To obtain the clearest image possible, scan at high resolution. It is recommended to use 1200 DPI.

After scanning, you will need to do some photo manipulation with the image. If you scanned a negative, you will have to invert the colors. This can be done even in Microsoft Paint, so there shouldn't be any difficulties. You can also do a little processing of the image in any graphic editor. It is recommended to increase the brightness or contrast.
If dust gets on the negative during scanning, it can be removed with a soft lens brush or cosmetic brush. To remove stains or scratches, you can use the healing brush tool. To do this, you can use free programs such as GIMP or Paint.net. They are available for free download and are easy to find on the Internet.

This image shows (from left to right): the forward scan, the inverted scan, and the final image after removing scratches and dust. The whole job took no more than 10 minutes.
It is possible, but the quality of scanning from a photograph will be worse than the result of scanning a negative or slide using a professional scanner.
It makes sense to scan photos if the originals (negatives or slides) are lost.
To scan films and slides, we use professional slide scanners NIKON SuperCoolScan 5000, designed for scanning transparent materials. To process the image scanned from the negative, powerful specialized workstations based on Intel i7 processors are used.
Negative and positive photographic films 35 mm (b/w and color), slides, photographs of any format. Photographic films can be cut into 4-6 frames and in rolls.
Negatives are automatically converted into positive images.
It is better not to remove slides from the frames.
Removing dust and scratches (unfortunately, this option is not applicable for b/w frames with a silver coating), ROC - color restoration, GEM - smoothing out increased grain, increasing sharpness. We can also save scanned photographs in a digital photo album as a slide show, further process images in Photoshop and much more.
We generally recommend saving in the two most common formats: JPEG (90%, 100%) and TIFF (8 Bit, 16 Bit). The ideal quality, of course, is the TIFF format, but photos in this format are 7-15 times larger in terms of storage space than in the JPEG format. We can scan slides with resolutions from 600dpi to 4000dpi. The most common resolution for scanning amateur negatives or slides, film frames is 2400dpi, since at this resolution it is possible to carry out excellent quality digital printing of photographs measuring 15x20 cm.
The process of the evolution of photography has been going on for almost 200 years, and during this time film photography has been reborn into digital photography, but after it film photo archives remain. To store them you need space and special conditions, but if the film is digitized, all this will not be necessary. Plus, digital photos are safer to store.
In addition to film photographic archives, there is a lot of film photographic equipment left, which are still being used to shoot. Film photography allows you to get very high quality images. This means that she will live together with “digital” for a long time. If photographic film is digitized, then using a computer you can take even better photographs.
Digitize photographic film- this means that each frame needs to be divided into separate pixel elements and information about their color and coordinates must be stored in a program file. For these purposes, you can use two main devices: a scanner or digital camera. How to digitize photographic film with their help will be discussed further.
Which scanner to digitize photographic film
A scanner is the most convenient device for digitizing your photographic films or slides of different formats. With its help, you can very quickly convert your film photo archive into digital view, while maintaining very good quality images. The level of quality will depend on the design of the scanner (Fig. 1).

Fig.1 You can digitize photographic film using different types of scanners.
There are different types of scanners for digitizing film, slides and other transparent photographic materials. Although they are all adapted to work with film, their capabilities are different, which means the price is different. In order to digitize photographic film at home, two types of scanners are suitable - a scanner with a slide module and a film scanner.
Calculators